Inspired by Powermonger (Amiga) - Part 1
- educkie
- Oct 14, 2022
- 3 min read

Way back in 1990/1991, one game really captured my imagination. Powermonger by Bullfrog. I was fascinated with what appeared to be a living breathing world – and that world looked like a gaming tabletop. As I was big into Dungeons and Dragons and various other tabletop games at the time, it really spoke to me.
I always wondered ‘how?’. This may have solidified my interest in programming. Although I didn’t learn programming until many years later.
In the last couple of years, as I’ve decided to learn how to program the Amiga, I still had that nagging feeling of ‘how?’ Now I know a little bit about Amiga hardware and programming. I had an idea.
Area Fill Mode using the Blitter. I was delving deep into the Amiga Hardware Reference Manual at the time. So, I began. First attempts were very clumsy and not creating the right results. That’s when I said “bugger it. I’m just going to use the graphics.library.” They have all these functions already made. I’m not going to reinvent the wheel. I just wanted to test my theory, with instant results.
Note: At this stage I'm not discussing how to set up VSCode and the Amiga Extension. I will cover that. Also, the following will not discuss the boilerplate code that's required to set up your View and ViewPorts and RastPorts. I will cover it.
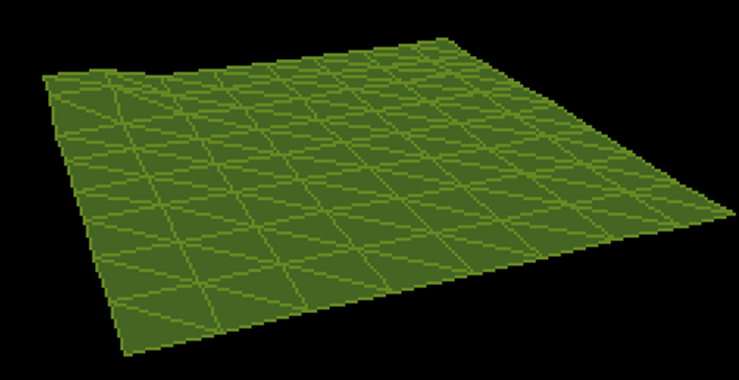
First thing I did was take a screenshot of the game running with no terrain to get in the way. I then drew lines over the image to show a grid. I could then find the screen position of all the points where the lines intersect.

With this point data, I know where to position my polygons. (triangles).
Below is the list of points in a 9x9 array. The struct Point is an amiga.graphics struct provided in gfx.h
typedef struct tPoint
{
WORDx,y;
} Point;
//points
Point points[9][9] =
{
{Point{96,107}, Point{115,105}, Point{133,102}, Point{150,100}, Point{167,98}, Point{182,96}, Point{198,94}, Point{213,92}, Point{225,90}},
{Point{98,113}, Point{118,110}, Point{137,108}, Point{154,106}, Point{172,103}, Point{188,101}, Point{204,99}, Point{220,97}, Point{232,95}},
{Point{100,121}, Point{121,117}, Point{141,114}, Point{160,112}, Point{179,109}, Point{194,106}, Point{211,104}, Point{227,101}, Point{239,99}},
{Point{103,129}, Point{125,125}, Point{146,122}, Point{165,119}, Point{184,116}, Point{202,113}, Point{219,110}, Point{236,107}, Point{249,105}},
{Point{106,139}, Point{129,134}, Point{151,130}, Point{172,127}, Point{192,123}, Point{210,120}, Point{229,117}, Point{246,114}, Point{260,111}},
{Point{109,148}, Point{134,143}, Point{157,139}, Point{178,135}, Point{200,131}, Point{220,128}, Point{238,125}, Point{257,121}, Point{272,119}},
{Point{112,160}, Point{139,155}, Point{164,150}, Point{186,145}, Point{210,141}, Point{230,137}, Point{250,133}, Point{269,130}, Point{285,127}},
{Point{117,174}, Point{146,168}, Point{172,162}, Point{196,157}, Point{221,152}, Point{242,148}, Point{264,143}, Point{283,139}, Point{299,136}},
{Point{122,191}, Point{153,184}, Point{181,177}, Point{208,171}, Point{234,165}, Point{256,160}, Point{279,154}, Point{300,150}, Point{317,146}}
};
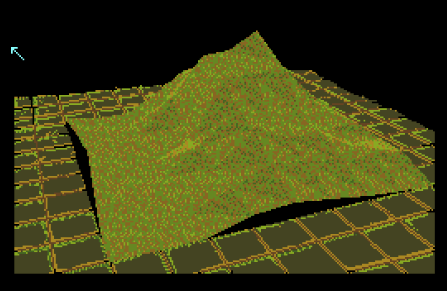
How does one indicate height? Simple. Just minus a value from the .y coordinate of the point.
And below is the heightmap that you can use to modify the heights
WORD height[9][9] =
{
{5,5,0,0,0,0,0,0,0},
{5,5,0,0,0,0,0,0,0},
{0,0,0,0,0,0,0,0,0},
{0,0,0,0,0,0,0,0,0},
{0,0,0,0,0,0,0,0,0},
{0,0,0,0,0,0,0,0,0},
{0,0,0,0,0,0,0,0,0},
{0,0,0,0,0,0,0,0,0},
{0,0,0,0,0,0,0,0,0}
};
So, I’m just elevating the top left corner by 5 pixels.
Below you can see the result with just a wireframe
To assist with the drawing routine, I created a Polygon class – which just contains 3 points. The 3 points of a triangle. It could have quite easily have been created as a struct. And I’ve done away with OOP paradigms for the moment (getter/setters).
class Polygon
{
public:
Pointp1;
Pointp2;
Point p3;
Polygon()
{
}
Polygon(Point _p1,Point _p2, Point _p3)
: p1(_p1), p2(_p2), p3(_p3)
{
}
};
So you can create a Polygon like
Point p1 = points[0][0];
Point p2 = points[1][0];
Point p3 = points[1][1];
Polygon polygon = Polygon(p1, p2, p3);
You can apply the height by modifying the .y value of the point
p1.y -= height[0][0];
Polygon can be sent to a Drawing routine as below
void DrawFilledPolygon(Polygon*poly)
{
AreaMove(RastPort, poly->p1.x, poly->p1.y);
AreaDraw(RastPort, poly->p2.x, poly->p2.y);
AreaDraw(RastPort, poly->p3.x, poly->p3.y);
AreaEnd(RastPort);
}
AreaMove AreaDraw& AreaEnd are all graphics.library routines.
That’s pretty much the basics of it. Next I’ll delve deeper into the full code. Including how I’ve set up the View, ViewPort and RastPort.

Comments